Distributed Graphic Planner (DGP)
The Distributed Graphic Planner (DGP) is a middleware-agnostic executive framework designed to design, program, analyze, and supervise complex distributed applications using Message Interpreted Petri Nets (MIPNs). Rather than relying on high-latency, specialized inter-middleware bridges (such as ROS-to-MQTT gateways), DGP implements an Abstract Middleware Interface that connects natively and concurrently to ROS 1, ROS 2, MQTT, and JIPC within a single task logic. The framework includes an integrated development environment (IDE) for visual task specification, model checking, and graphical execution tracking, and a high-performance, event-driven dispatcher that runs task models efficiently with negligible overhead.
GDGP. General Distributed Graphical Planner.
This version of DGP is able to work with several middlewares at the same time: MQTT, ROS1, ROS2 and JIPC. It has been tested with these middlewares:
- ROS1. ROS Noetic.
- ROS2. ROS Jazzy.
- MQTT. Using Mosquitto broker.
- JIPC. Version 4.0.
All the commands in this document and the scripts provided were developed for Linux. However, since all the software was developed in Java, it should be possible to create equivalent scripts for windows
Requirements
- Java 17+
Download
- You can download the latest version here.
Install
To install GDGP follow these easy steps:
- Uncompress the tar file in the directory where you want to install it. I am going to assume is your home (
~) for now on:
tar -xzvf GDGP.tar.gzRunning
After installing the system as described in the previous section, if you have installed Java (version 17+) you should be able to start the GDGP modules:
- Start RoboGraph dispatch to run tasks (petri nets):
~/DGP/bin$ ./GDGPDispatch - Start RobGraph GUI to edit tasks and monitor their execution:
~/DGP/bin$ ./GDGPGui
You should see the next window:
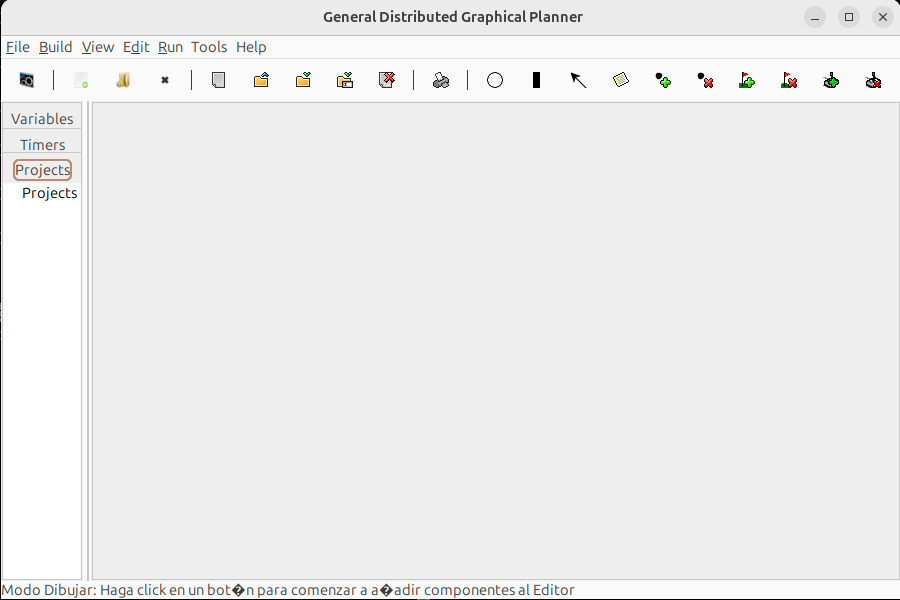
By default, only the middleware ROS1 is activated to change this, see the "activating middlewares" section. Now you have the basic system running. Using the GUI you can create your first DGP project with packages and some basic Tasks (Petri nets) for example with timers. However, a real application will include several modules (module1, module2, ...) running on one or several middlewares (so far JIPC, ROS1, ROS2 and MQTT is implemented) together with messages (msg1, msg2, ...) to share information between the modules.
Activating middlewares
The list of middlewares activated in DGP are defined in the text file DGP/res/middleware_list.
When starting DGPDispatch will try to connect all the middlewares listed there. Notice that if you activate some middlewares such as JIPC, ROS1 or MQTT you will need to start JCentral, rosCore or the MQTT broker before starting anything else:
- JIPC. To start jcentral we provide the script
~/DGP/bin/jcentral. You can also start an external jcentral. - ROS1. To start roscore we provide the script
~/DGP/bin/startROSCore. You can also start an external roscore. - ROS2. ROS2 does not have a roscore. Nothing needs to be started.
- MQTT. We recommend to start the mosquitto broker (
mosquitto -v)
Testing the system.
A few examples are provided to test if the different middlewares are working properly. First, it might be a good idea to test each middleware individually. The MIPNs used in this section are in the project DGP/examples/paper_RAS. You should first open the project and compile it to generate the class files.
Next image shows the latency petri net:
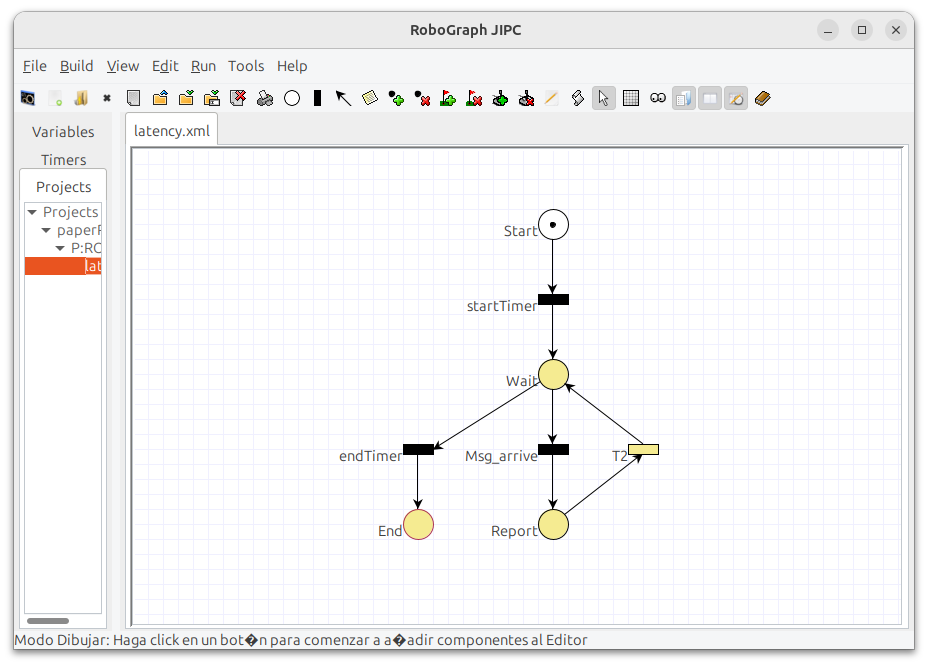
After two seconds, the startTime timer will finish and the wait place will get a token. In this state, if the right message is received from the publisher module, it will fire the transition Msg_arrive writing in a text file (<MDLWR>.txt) the index of the message, the time it arrived and the time the transition was fired. The Report place is activated and a new message is published.
Testing DGP with ROS1.
- start roscore:
~/DGP/bin$ ./startROSCore - start DGP dispatch:
~/DGP/bin$ ./GDGPDispatch - start DGP Gui:
~/DGP/bin$ ./GDGPGui
Then in the GUI shown in the previous image you should follow these steps:
- load the project
~/DGP/examples/paper_RAS/paperROS1- file->open project and select the project. (if you want to see the MIPN, open the net latency inside the package
ROS1Tests)
- file->open project and select the project. (if you want to see the MIPN, open the net latency inside the package
- compile the project
- hit the menu compile and compile the project
- start the task. For that you need to send a message to DGP dispath requesting the start of the task. This can be done from the DGP GUI:
- click the button on the left (switch running mode) to change to debug mode to debug.
- click on the fourth button from the left (blue arrow - "start monitoring running task") to monitor tasks.
- click on the second button from the left (race car - "execute a task") to send a message to dispatch requesting the execution of a task:
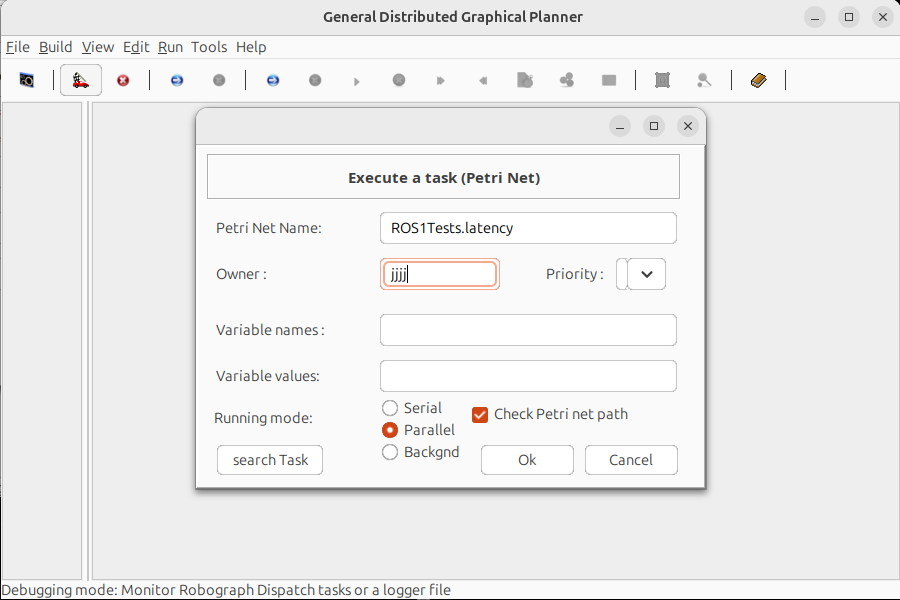
- in the petri name box write "ROS1Tests.latency" like in the image above.
- in the Owner you can write a few characters (right now it does not matter) "XXX"
- click on Ok.
- you should see the petri net and a mark on the place start that in a couple of seconds will move to wait. In that state is waiting for the ROS1 message "std_msgs.String" with the topic "/disa/dgp/paper/". Every time receives this message, fires transition MSG_arrive, reports it and returns to wait. This is done so fast that we might just see the token blinking. After three minutes transition T3 fires and the task ends.
4. start another ROS1 module that publishes the message:
- we provide as example a module that publishes the ROS1 message "std_msgs.String" with the topic "/disa/dgp/paper/" to start this program:
~/DGP/bin$ ./ROS1PublisherPaperit will start publishing the message and printing on the screen the number of the message and time. The report place in the MIPN will write in the ROS1.txt file a line per each message received with the number of the message, the time the message was sent and the time dispatch react to the message.
Testing DGP with ROS2.
- Comment (using %) all the middlewares in the file
DGP/res/middleware_listbut the line withROS2_LP. - Start dispatch by executing the file:
~/DGP/bin$ ./GDGPDispatch - Order the execution of the petri net. You can do it from the GUI starting
DGP/bin/GDGPGuias in the ROS1 case, then changing to monitoring mode, click on the execute petri net button and typeROS2Tests.latencyas the name of the petri net. - Finally, you need to start the ROS2 module that publishes messages with topic
"/helloRos"of typeid.jrosmessages.std_msgs.StringMessagewith the string including"Hello ROS #ROS2%"+ index +" "+ time +" $"where index is the index of the message and time is the current publishing time in milliseconds (System.currentTimeMillis()). It can also subscribe to message"ROS2/miTopic2"published by the petri net. We provide one example that can be started with:~/DGP/bin$ ./ROS2PublisherPaper
Testing DGP with MQTT.
- Comment (using %) all the middlewares in the file
DGP/res/middleware_listbut the line withMQTT_PAHO. - Start the MQTT broker (for example mosquitto broker)
- Start dispatch by executing the file:
~/DGP/bin$ ./GDGPDispatch - Order the execution of the petri net. You can do it from the GUI starting
DGP/bin/GDGPGui, then changing to monitoring mode, click on the execute petri net button and typeMQTTTests.latencyas the name of the petri net. - Finally, you need to start the MQTT module that publishes messages with topic
"miTopic"with the string including"Hello ROS #MQTT%"+ index +" "+ time +" $"where index is the index of message and time is the current publishing time in milliseconds (System.currentTimeMillis()). It can also subscribe to message"MQTT/miTopic2"published by the petri net. We provide one example that can be started with:~/DGP/bin$ ./MQTTPublisherPaper
Testing DGP with JIPC.
- Comment (using %) all the middlewares in the file
DGP/res/middleware_listbut the line withJIPC. - Start jcentral. You can do it in your own system or executing the file:
~/DGP/bin$ ./jcentral - Start dispatch by executing the file:
~/DGP/bin$ ./GDGPDispatch - Order the execution of the petri net. You can do it from the GUI starting
DGP/bin/GDGPGui, then changing to monitoring mode, click on the execute petri net button and typeJIPCTests.latencyas the name of the petri net. - Finally, you need to start the JIPC module that publishes messages with topic
"/disa/dgp/paper/"of typestd_msgs.Stringwith the string including"Hello ROS #ROS1%"+ index +" "+ time +" $"where index is the index of message and time is the current publishing time in milliseconds (System.currentTimeMillis()). It can also subscribe to message"ROS1/miTopic2"published by the petri net. We provide one example that can be started with:~/DGP/bin$ ./ROS1PublisherPaper
NOTE: You will rarely see the token in the Report place because the transition T2 fires immediately (no condition). However, you should see the corresponding file with latency times (ROS1.txt, ROS2.txt, MQTT.txt or JIPC.txt).
Turtle Example
Another example provided is a petri net that moves the ROS turtle named turtle_square. The Petri net is in the project DGP/examples/Tasks and it is shown in the next image:
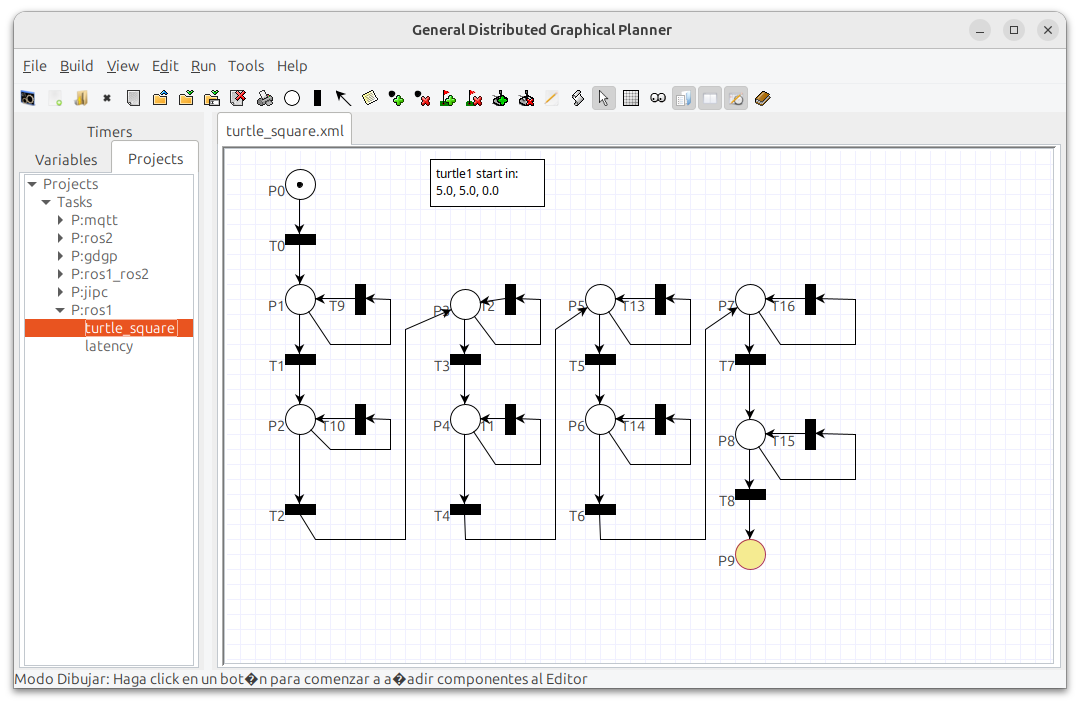
This net has five branches that behave in the same way. Each branch of this petri net has two places. The actions associated to the first place (P1) is to start a timer (pub_rate) with 500 msec and to send the message to move forward (geometry_msgs/Twist). Transition T9 is associated with the end of the pub_rate timer so, it fired after 500 msec and the first place (P1) gets again the token executing again the associated actions. The result is that every 500 msec the message to move forward is published until the other transition (T1) is fired. This transition is also associated to another timer (action_time) but this time with 5 seconds. After that time the token is going to be moved to the second place where a message commanding the turtle to turn is sended every 500 msec.
To run this task you need to execute the following steps that are very similar for the ROS1 and ROS2 examples:
- ROS1.
- Comment (using %) all the middlewares in the file
DGP/res/middleware_listbut the line withROS1_SA. - Start ros core. You can do it in your own system or executing the file:
~/DGP/bin$ ./startROSCore - Start the turtlesim in ROS1. You can use a docker version (I tried
osrf/ros:noetic-desktop-full). The turtle simulator should be started as:rosrun turtlesim turtlesim_node - Start dispatch:
~/DGP/bin$ ./GDGPDispatch - Order the execution of the petri net. You can do it from the GUI starting
DGP/bin/GDGPGui, then changing to monitoring mode, click on the execute petri net button and typeros1.turtle_squareas the name of the petri net.
- Comment (using %) all the middlewares in the file
After this you should see the turtle moving even though do not expect a perfect square :-)
Defining custom messages
The type of messages that can be published or subscribed to depend on the middleware. For example, in the MQTT case there is only a type of message (String) but middlewares like ROS1, ROS2 and JIPC allow to define messages that contain different type of data. For your personal project you might like to include the messages that the modules exchange with DGP. Those messages should be defined as java classes that must be included in java packages. Those packages should be included in the CLASSPATH when running the system. DGP reads the list of these packages from the following text files:
DGP/res/modulesROS1. List of the java packages where the ROS1 messages are defined.DGP/res/modulesROS2. List of the java packages where the ROS2 messages are defined.DGP/res/modulesJIPC. List of the java packages where the JIPC messages are defined.
You can use standard messages included in the ROS1 or ROS2 IDEs (see standard messages below) or define your own messages (see custom messages below).
Standard messages
You can use the standard messages from ROS 1 (jros1messages) or ROS 2 (jros2messages) together with the general ROS messages (jrosmessages) but notice that DGP adopts a unified message namespace across all supported middlewares (see below). To add this standard packages messages you should add the package to the corresponding text file:
DGP/res/modulesROS1. For ROS1 messages.DGP/res/modulesROS2. For ROS2 messages.DGP/res/modulesJIPC. For JIPC messages.
Obviously, the java packages on the list should be in the java CLASSPATH.
Adding custom messages
The addition of custom messages depends on the middleware to use. As a general case, an Idea intellij project is provided for each middleware:
- ROS1.
DGP/IdeaMsgProjects/ROS1CustomMsgs - ROS2.
DGP/IdeaMSgProjects/ROS2CustomMsgs
You need to follow these steps to include your custom messages:
- Add your custom messages to the project. See the
readme.mdfile inside that project. - A jar file in the
build/libsdirectory will be created. Copy the jar file to a directory in the CLASSPATH. For example, in~/DGP/classif you uncompress theGDGP.tar.gzfile in your home folder. - Add the name of your messages package to the
~/DGP/res/modulesfile.
In general, the format of the messages depend on the middleware:
- ROS1. For custom messages check the
ROS1Messagesintellij project. That project creates the java files from the msg files but you can also create the java files manually into a java package and add the package toDGP/res/modulesROS1. - ROS2. For custom messages check the
ROS2CustomMsgsintellij project. That project creates the java files from the msg files but you can also create the java files manually into a java package and add the package toDGP/res/modulesROS2. - JIPC. You can create the java class messages in a java package and add the package to
DGP/res/modulesJIPC.
Dealing with same messages in different middlewares.
DGP adopts a unified message namespace across all supported middlewares. Messages representing the same data type may be defined in multiple middlewares (e.g., std_msgs/String in ROS1 and ROS2). Publishing a message causes it to be propagated to all middlewares in which that message is defined; the same behavior applies to subscriptions. For example, the message robograph/roboGraph_dispatch_run_PN_message must be defined in each middleware intended to command DGP dispatch for task execution. This design simplifies cross-middleware communication and namespace management. Middleware-specific message isolation can be achieved by organizing messages under a root package named after the corresponding middleware.
DGP messages
DGP dispatch defines its own messages. On one side, it subscribes to messages for:
- Executing a task (
roboGraph_dispatch_run_PN_message), - Stopping a task (
roboGraph_dispatch_kill_PN_message), - Asking for the status of a task (
roboGraph_dispatch_query_stat_PN_message), - Asking for the status of all the tasks (
roboGraph_dispatch_query_stat_message).
On the other side, it publishes messages to:
- Report the status of a task (
roboGraph_dispatch_stat_PN_message) - Report the status of all the tasks (
roboGraph_dispatch_stat_message) - Report the end of a task (
roboGraph_dispatch_end_PN_message)
Communication between DGP dispatch and DGP GUI uses most of these messages. Since it makes no sense for them to communicate with more than one middleware, when DGP GUI starts, if several middlewares are defined, one will be selected according to the following preference: First, MQTT; if this is not enabled, JIPC will be used; if neither of these is active, ROS1 will be used; and finally, as a last resort, ROS2 will be used.
PROBLEM WITH ROS2: Because of the ROS2 API problem mentioned above, the messages module ros2.robograph should not be included in DGP/res/modulesROS2 unless this is the only middleware.